Soil Injection
Soil Injection is a fairly common procedure used on trees to achieve any or all of the following goals:
- Fertilization of the soil
- Inoculation of the Root Zone
The procedure is fairly standard, and various different products are employed to achieve the desired effects.
Overall Procedure
Soil Injection involves the injection of liquid solutions at regular spacing in the soil throughout the area directly beneath the canopy, starting from the trunk and extending just beyond the drip line. Injections are made under pressure of about 150 to 200 psi to a depth of 8 to 10-inches.
Injection Equipment

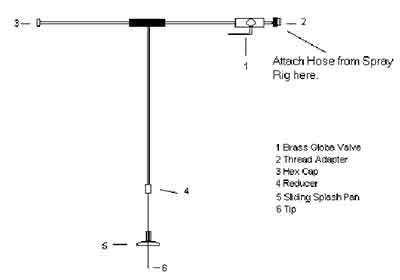
Injections are made with a narrow injection probe having a pointed tip with orifices on the sides. A ball or trigger valve controls the flow of liquid to the probe. The length of the probe is designed to allow injections to a depth of about 8 to 10-inches. Various injection probes are commercially available. The probe is connected to a hose line from a pressurized tank. A spray rig is often used, and the spray nozzle is replaced by an injection probe.
Pattern of Injections
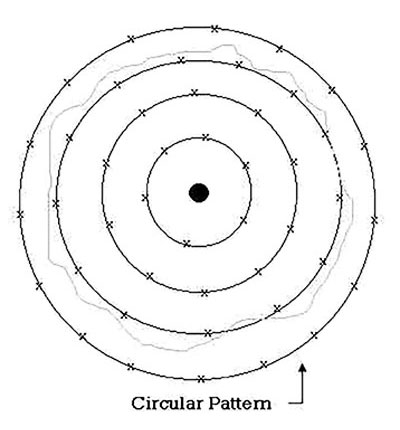
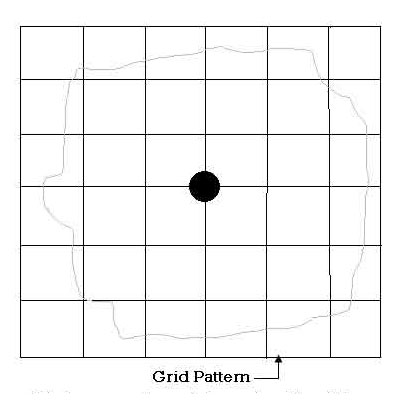
Injections are made “on 2 ½ foot centers.” This is industry jargon, and it simply means that holes are spaced apart every 2 ½ feet following either a grid pattern, or a concentric circular pattern as diagrammed on the following page. The end result is a pattern of evenly spaced holes throughout the area underneath the canopy of the tree.
Soil Injection Patterns
Following are bird's eye views from above the tree looking through the canopy to the ground. The dark spot represents the trunk, while the irregular grey line represents the border of the canopy (the drip line).

Injections are made at each "x" spaced apart every 2-5 feet. Rings are also spaced apart by 2.5 feet. A circle of 40 ft. diameter (i.e. 40ft canopy spread) covers 1,250 sq. ft.

Injections are made at each intersection of the grid lines. Each of the lines are spaced apart by 2.5 feet.
How Do I Know How Much Liquid I am Injecting per Hole?
First you need to decide how much liquid you will shoot into each hole. The most common amounts used are 1 or 2 quarts per hole. This example will use 1 quart per injection.
To inject 1 quart per hole, you have to measure how long it takes for your rig to shoot 1 quart of liquid at the set pressure. Here is how it’s done:
- First, you have to set the pump pressure. Typical injection pressures range from 150 to 200 psi. You can go lower, but it is not advisable to go higher than 200 psi.
- Next, you find a container that can measure a quart of liquid. You can use an empty quart-sized milk carton, or a pitcher with quart measurement marks, for example. (One quart is 32-oz.)
- Set up your rig, stick the injection needle into the quart milk carton or other measuring container, and open the valve or trigger. Then count how many seconds it takes for the container to fill to 1 quart. Write this number down. This is your 1-quart time.
- When you actually do the soil injections, you will open the valve or trigger for the 1-quart time that you measured in step three. Use this same time for each injection.
Comments: You can inject more or less liquid per hole by using different injection times. In heavy clay soils, you might have trouble getting the soil to accept a whole quart. In such cases, mix your fertilizer solution to double strength, and then inject only a half-quart per hole (one pint). If you are working in sandy soils and you want to inject more liquid per hole, you can mix your fertilizer solution to half-strength, and inject two quarts per hole. Either way, you are applying the same amount of fertilizer per 1000 sq ft. That is the important thing.
How Do I Know How Much Fertilizer to Mix?
Fertilizer mixes usually give application based on 1000 sq ft.
To figure out your fertilizer mix:
- Measure the canopy spread (distance across the canopy, from dripline to dripline). Multiply this by itself (or “square’ it). This is your treatment area.
- Divide your treatment area by 1000 sq ft. Write this number down. This is the number of 1000 sq ft sections to treat. It usually involves whole sections and partial sections. (Partial sections are represented by fractions or decimals.)
- Since fertilizer mixes typically tell you how much to apply per 1000 sq ft sections, all you need to do is mix the same amount for every 1000-ft section (or partial section). So multiply the number you got in step 2 by the application rate on the bag given per 1000 sq ft.
Comments: The example above assumes you have no obstructions, and that the entire area beneath the canopy is accessible. In reality, you will usually encounter obstructions like a cement walkway, the street, the side of a building, etc. You have to skip over these areas, so these will reduce your treatment area. You will need to subtract off these blocked areas when measuring your treatment area. Then reduce the amount of liquid mix accordingly. Your injections patterns will rarely be perfect, and you will need to work around problems. But don’t worry, that’s normal.
Remember: You will be making injections roughly every 2½ feet along your grid, skipping over obstructed areas. In practice, you will need to tweak your injection pattern a bit to fit the situation. You may tighten up the spacing if your area is severely reduced. Street trees, for example, may have only a small area available for injection, so you are severely limited in what you can apply. In such cases, accept the fact that you can only supply limited treatments, and shoot some fertilizer into the areas available to you, abandoning the grid spacing when necessary. Do not try to get large amounts of fertilizer into a small space. Too strong a mixture can burn the roots.
Don’t Overdose
Root injections procedures are based on the ideal situation, where the entire area is accessible. In most cases, you will only be able to treat a portion of the area. Tighten up your grid a bit where it helps, but never try to force all the fertilizer into a small area. Under application is far better than overdosing.
Soil Injection Products
- ROOTS Injectable for Trees: This is an ideal inoculant used to provide mycorrhizal fungi and beneficial rhizosphere bacteria to the root zone of mature trees and shrubs, or new transplants. One packet pair (A+B) makes 200 injections at 2.5-ft spacing (1250 sq ft). Visit www.lebanonturf.com for specific product information.
- ROOTS Fertilizer for Trees 27-9-9: This is a spring fertilizer containing 50% slow-release nitrogen, various important micronutrients, and an advanced wetting agent all in one. It is used for all trees and shrubs. The slow-release nitrogen is a fine powder designed to be completely suspendable in an agitated tank.
- ROOTS Fertilizer for Trees SRN 11-22-22: This is a fall fertilizer containing 50% slow-release nitrogen, various important micronutrients, and an advanced wetting agent all in one. It is used for all trees and shrubs. The slow-release nitrogen is a fine powder designed to be completely suspendable in an agitated tank.
- ROOTS BioPak Plus: BioPak Plus is a dry, water soluble micronutrient treatment with beneficial rhizosphere bacteria and 3-0-20 NPK fertilizer. Micronutrient treatments are excellent for plants and turf undergoing or recovering from stress, and for plants or turf expressing symptoms of mineral nutrient deficiency, like chlorosis (pale leaf color) and necrosis (localized tissue death). Product contains various mineral macro and micronutrients in soluble forms including iron, sulfur, magnesium, manganese, boron, and zinc.